
Dirt Cups Recipe
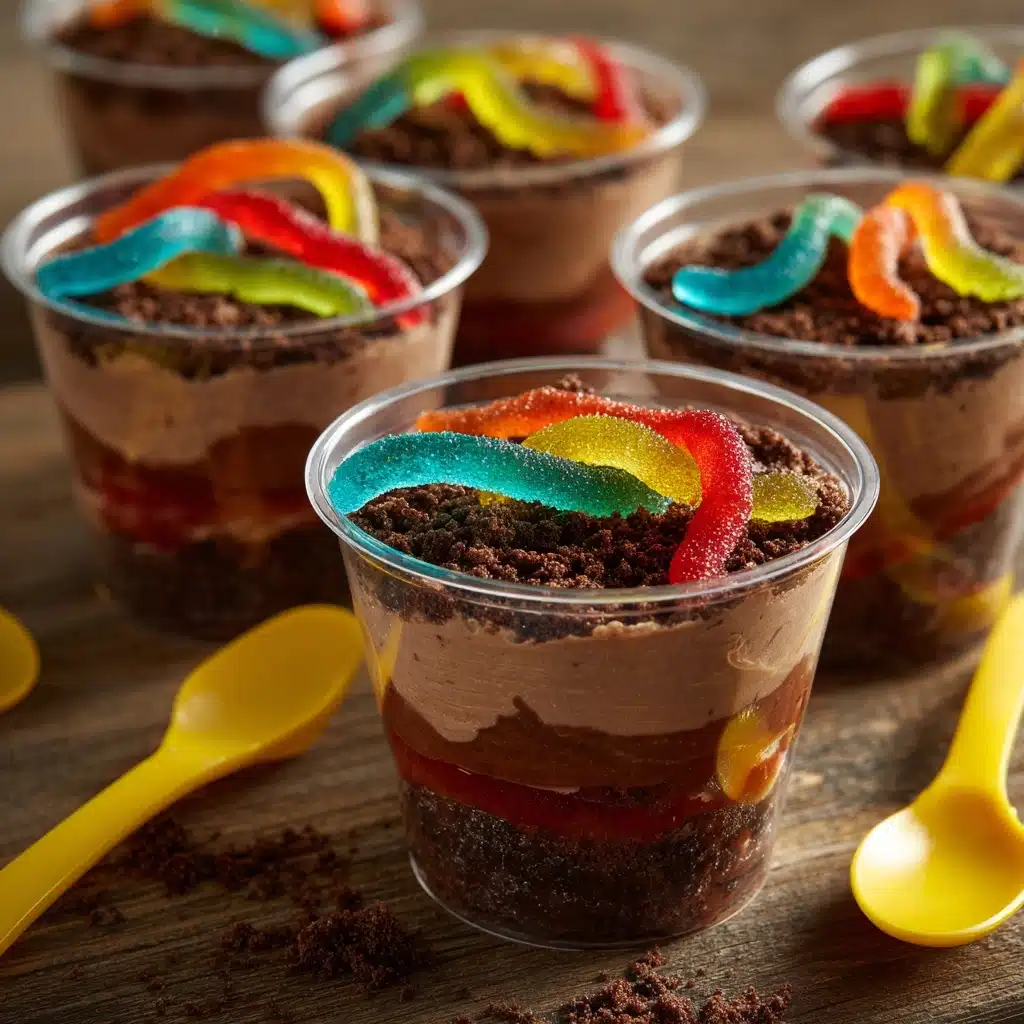
If you’re looking for a dessert that’s equal parts fun, nostalgic, and delicious, Dirt Cups are here to steal the show! This whimsical treat layers silky chocolate pudding, fluffy whipped topping, and crunchy Oreo “dirt,” all finished off with a silly swarm of gummy worms wriggling on top. Whether you’re crafting these for a kids’ birthday party or just want a playful, low-stress dessert, Dirt Cups bring smiles all around. Plus, they’re a make-ahead hero and a total crowd-pleaser for anyone craving chocolatey comfort with a creative twist.

Ingredients You’ll Need
The beauty of Dirt Cups lies in their simplicity—each ingredient is a vital part of the magic! From the creamy pudding to the “earthy” cookie crumbs, every layer adds to both the taste and the delightful illusion of edible dirt.
- Instant chocolate pudding mix (3.4 ounces): The main event! This gives the cups their luscious, chocolaty body and irresistible flavor.
- Milk (2 cups): Using cold milk ensures the pudding whips up perfectly thick and smooth, so be sure yours is straight from the fridge.
- Whipped topping (8 ounces, thawed): Folding this in lightens the pudding, creating an airy, mousse-like texture that’s a dream to eat.
- Oreo cookies (10-12, crushed): These bring that crunchy, “dirt” topping with deep chocolate flavor and a bit of playful messiness—don’t be shy about crushing them good!
- Gummy worms (32 pieces): The star garnish! Four per cup makes every serving fun and colorful, and you can mix up the colors for extra whimsy.
How to Make Dirt Cups
Step 1: Mix the Pudding
Start by grabbing a medium mixing bowl and pouring in the cold milk. Sprinkle your instant chocolate pudding mix over the milk, then whisk for about two minutes. You’ll notice the mixture getting thicker and silkier as you whisk—aim for a gorgeous, glossy consistency.
Step 2: Let the Pudding Set
Set the bowl aside and let the pudding sit for about five minutes. This quick rest time helps the pudding firm up to that perfectly scoopable, luxurious texture that makes Dirt Cups so irresistible.
Step 3: Fold in the Whipped Topping
Now, gently fold in the thawed whipped topping using a spatula. Fold slowly so you don’t deflate all that lovely air—the goal is a fluffy, mousse-like pudding that’s both light and rich.
Step 4: Fill the Cups
Spoon the creamy mixture into individual cups or glasses, filling each about three-quarters of the way. Small jelly jars, plastic cups, or even little flower pots (thoroughly cleaned!) work beautifully and add to the rustic dirt theme.
Step 5: Add the Cookie “Dirt”
Take your crushed Oreo cookies and sprinkle a generous layer over each serving. Don’t worry about being neat—the irregular crumbles look just like real dirt and add a fun crunch with every bite!
Step 6: Decorate with Gummy Worms
Top off each cup with four gummy worms, arranging them so they look like they’re poking out of the “earth.” This is the step where kids (and grown-ups with childlike hearts) will want to jump in and help. The more worms, the merrier!
Step 7: Chill Until Serving
Pop the finished cups into the refrigerator until you’re ready to serve. Chilling them not only improves the flavor, but it also helps the layers set up nicely for picture-perfect Dirt Cups.
How to Serve Dirt Cups
Dirt Cups Garnishes
While classic gummy worms are a must, don’t be afraid to get creative! Edible flowers, mini chocolate rocks, or crushed graham crackers can make your Dirt Cups look like a real mini garden. A sprinkle of green-tinted coconut adds an extra dose of leafy “grass.”
Side Dishes
Dirt Cups are delightfully rich and chocolatey, so pairing them with fresh fruit like strawberries or orange slices makes for a balanced, refreshing contrast. If you’re hosting a party, try serving alongside a colorful fruit platter or even mini sandwiches for a playful, picnic-style spread.
Creative Ways to Present Dirt Cups
For a true showstopper, serve your Dirt Cups in small terra cotta pots lined with parchment paper, or use clear mason jars for a rustic vibe. If you’re making them for a big crowd, try assembling Dirt Cups in a trifle bowl and serve with a big spoon for everyone to dig in together. Little hand trowels as serving spoons? Always a hit!
Make Ahead and Storage
Storing Leftovers
Store any leftover Dirt Cups in the refrigerator, covered with plastic wrap or lids. They’ll stay fresh and tasty for up to three days, though the cookie topping may soften a bit over time—still delicious, just with a different texture!
Freezing
While Dirt Cups are best enjoyed fresh from the fridge, you can freeze them (without gummy worms) for up to a month. Thaw in the fridge overnight before serving, and wait to add the cookie “dirt” and worms until right before you eat to maintain the best texture.
Reheating
You won’t need to reheat Dirt Cups, but if yours have been in the fridge for a long time, let them sit at room temperature for about ten minutes before serving for the silkiest, creamiest pudding texture.
FAQs
Can I make Dirt Cups ahead of time?
Absolutely! Dirt Cups are super make-ahead friendly. Prep them the night before your event or party, cover, and chill until you’re ready to serve. Just add the gummy worms right before serving for the freshest look.
What if I don’t have whipped topping?
If you’re out of whipped topping, you can use freshly whipped cream sweetened with a bit of powdered sugar. Whip until you have soft peaks, then fold it into the pudding just like you would with store-bought topping.
Are there any allergy-friendly versions of Dirt Cups?
You bet! Use allergy-conscious pudding mixes and cookies, swap in non-dairy milk and whipped topping, and hunt down gelatin-free or vegan gummy worms to ensure everyone can enjoy this playful dessert.
Can I use homemade pudding?
Definitely! Homemade chocolate pudding adds a lush, deep flavor, though it takes a bit more effort. Make sure your pudding is fully cooled before folding in whipped topping so the texture stays light and fluffy.
How can I crush Oreos for the topping?
Place cookies in a sturdy zip-top bag and use a rolling pin to smash them, or pulse in a food processor for finer crumbs. Just don’t worry about uniformity—some big chunks are actually more fun!
Final Thoughts
Whether you’re revisiting a childhood favorite or introducing these playful treats to new friends, Dirt Cups turn dessert into a hands-on celebration. They’re easy, endlessly customizable, and guaranteed to spark smiles—so don’t hesitate to whip up a batch and dig right in!
PrintDirt Cups Recipe

Dirt Cups are a fun and easy dessert that kids and adults will love. Made with layers of creamy chocolate pudding, whipped topping, crushed Oreo cookies, and gummy worms, these treats are perfect for parties or just a playful snack.
- Prep Time: 15 minutes
- Cook Time: 0 minutes
- Total Time: 20 minutes
- Yield: 4 servings 1x
- Category: Dessert
- Method: Mixing, Chilling
- Cuisine: American
- Diet: Vegetarian
Ingredients
Pudding Mixture:
- 3.4 ounces instant chocolate pudding mix
- 2 cups milk
Additional Layers:
- 8 ounces whipped topping (thawed)
- 10–12 Oreo cookies, crushed
- 32 gummy worms
Instructions
- Prepare Pudding: In a medium bowl, add cold milk and sprinkle pudding mix over it. Whisk until well combined.
- Thicken: Let the mixture sit for 5 minutes to thicken.
- Combine: Gently fold in the whipped topping until well mixed.
- Layer: Spoon the mixture into glasses or cups.
- Add Oreos: Sprinkle the crushed Oreo cookies on top of the pudding in each cup.
- Garnish: Place 4 gummy worms on top of each cup.
- Chill: Refrigerate until ready to serve.
Nutrition
- Serving Size: 1 serving
- Calories: 320
- Sugar: 25g
- Sodium: 380mg
- Fat: 14g
- Saturated Fat: 8g
- Unsaturated Fat: 5g
- Trans Fat: 0g
- Carbohydrates: 45g
- Fiber: 1g
- Protein: 3g
- Cholesterol: 5mg
Keywords: Dirt Cups, Chocolate Pudding, Dessert, Kids, Party, Oreo Cookies, Gummy Worms
