
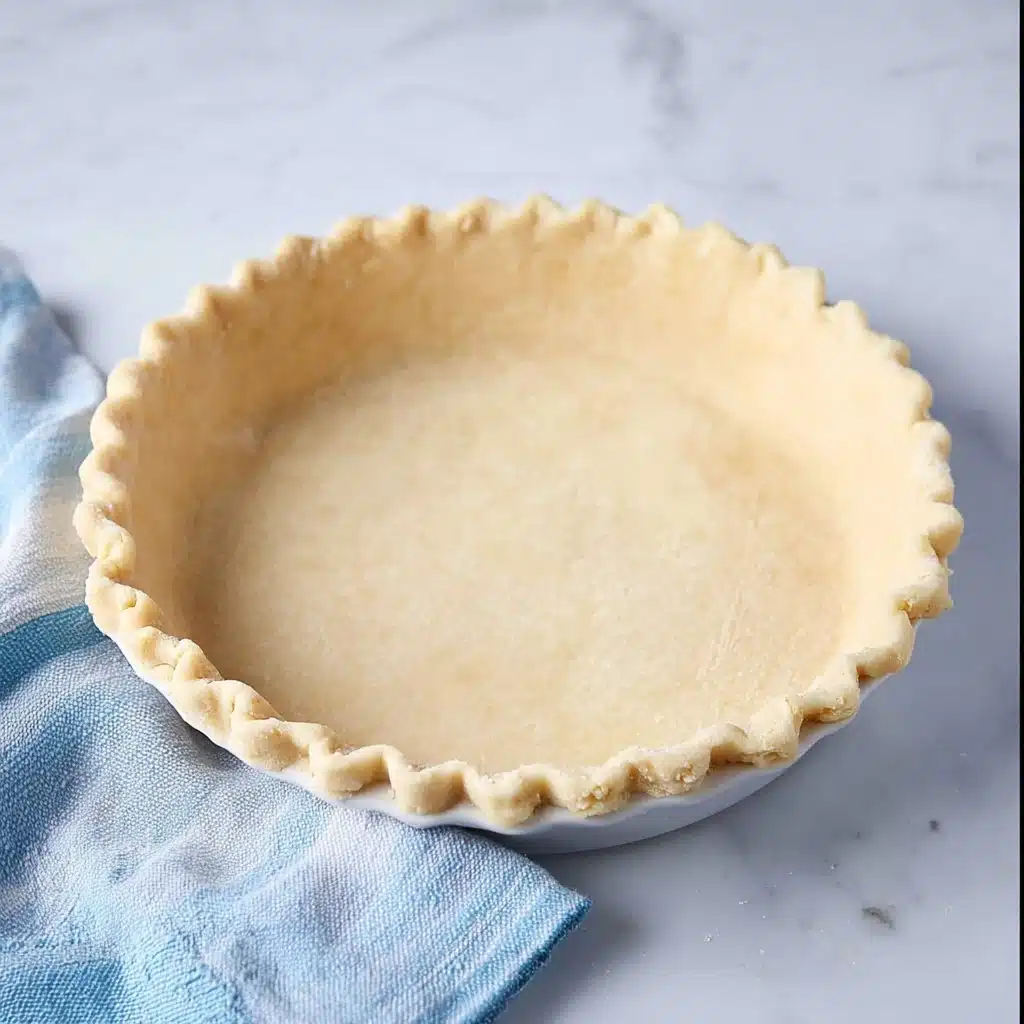
Classic Crisco Pie Crust Recipe
If you have ever dreamed of the perfect flaky, buttery, and tender crust to crown your homemade pies, then you are going to fall head over heels for this Classic Crisco Pie Crust. This recipe delivers that nostalgic, melt-in-your-mouth texture that transforms any pie into a comforting masterpiece. Using Crisco vegetable shortening ensures each bite is delightfully flaky without the fuss, making it a timeless favorite for both sweet and savory pies. Whether you are a seasoned baker or just starting out, this Classic Crisco Pie Crust is a reliable base that never disappoints.
Ingredients You’ll Need
For a pie crust this fabulous, you don’t need a long list of ingredients—just a handful of basics that work in perfect harmony. Each one plays a crucial role, giving your crust the ideal texture and flavor that’s both tender and crisp.
- 1 ½ cups Flour: The backbone of your crust, all-purpose flour provides structure and a light, tender crumb.
- ½ teaspoon Salt: Enhances the overall flavor, balancing the richness of the shortening.
- ½ cup Vegetable Shortening (Crisco): The secret to incredible flakiness and a tender bite without any greasy aftertaste.
- 4 Tablespoons Ice Water: Just enough to bring the dough together while keeping it cool, which is key to flaky layers.
How to Make Classic Crisco Pie Crust
Step 1: Mix the Dry Ingredients
Start by combining 1 ½ cups of flour with ½ teaspoon of salt in a large bowl. This ensures the salt is evenly distributed, giving your crust a balanced flavor from edge to edge.
Step 2: Cut in the Crisco
Next, cut the ½ cup of vegetable shortening (Crisco is ideal here) into 1-inch cubes and add them to your flour mixture. Using a pastry blender, cut the shortening into the flour until the mixture resembles roughly pea-sized balls. This technique traps pockets of fat that create those delightful flaky layers you love.
Step 3: Add Ice Water Gradually
Adding ice-cold water one tablespoon at a time, mix gently with a rubber spatula. This gradual incorporation keeps the fat cold and helps the dough come together without becoming tough. Stop once the dough begins to hold.
Step 4: Form the Dough Disk
After all 4 tablespoons of ice water are added, quickly knead the dough with your hands just until it forms a cohesive disk. It’s important to handle the dough gently here to avoid overworking, which can make the crust tough.
Step 5: Chill the Dough
Wrap your dough disk tightly in plastic wrap and refrigerate it for at least 30 minutes. This resting period relaxes the gluten and solidifies the fat, which is the secret to rolling out a smooth, crack-free crust.
Step 6: Roll Out the Dough
Once chilled, remove your dough from the refrigerator and roll it out on a floured surface or pastry mat. Aim for a 12-inch circle, perfect for an 8- or 9-inch pie pan. Rolling evenly ensures uniform baking and a beautiful pie shape.
Step 7: Transfer and Bake
Carefully transfer the dough to your pie dish. From here, you can either par-bake the crust if the recipe calls for it or fill it with your favorite fillings before baking. This Classic Crisco Pie Crust holds up wonderfully to any filling, whether it’s fruit, custard, or savory delights.
How to Serve Classic Crisco Pie Crust

Garnishes
Sprinkle some coarse sugar or cracked sea salt over the crust edges before baking for a sparkling finish. A brush of egg wash makes it glossy and golden, adding an extra layer of appeal that makes this crust irresistible at first sight.
Side Dishes
Pair pie slices baked with this Classic Crisco Pie Crust alongside fresh whipped cream, a scoop of vanilla ice cream, or a dollop of crème fraîche. For savory pies, a crisp salad or roasted vegetables complements the flaky crust beautifully.
Creative Ways to Present
Don’t be afraid to get artistic! Use cookie cutters to create lattice patterns or festive shapes for the crust’s top layer. You can also cut decorative vents or crimp the edges with a fork for charming details that make your pie the star of any gathering.
Make Ahead and Storage
Storing Leftovers
If you have leftover pie crust dough, wrap it tightly in plastic wrap and store it in the refrigerator for up to 2 days. This keeps the dough fresh and easy to roll out whenever you’re ready to bake again.
Freezing
The Classic Crisco Pie Crust freezes wonderfully. After shaping your dough disk, wrap it well with plastic and place it in a freezer bag. It can be frozen for up to a month. Thaw overnight in the fridge before rolling out to maintain that perfect texture.
Reheating
If you have a baked pie using this crust, reheat slices at 300°F for about 10 minutes to bring back that crisp flakiness. Avoid microwaving as it can make the crust soggy, taking away from the delightful crunch that makes this crust special.
FAQs
Can I substitute butter for Crisco in this recipe?
While butter adds rich flavor, Crisco vegetable shortening is what gives this crust its signature flakiness and tender texture. Using butter instead may result in a less flaky crust, but you can try a combination of butter and shortening for a balanced taste and texture.
Why is the ice water important in this recipe?
Ice water keeps the fat in the dough cold, which is essential for creating those flaky layers as the fat melts during baking. Warm water can cause the fat to soften too soon, resulting in a tougher crust.
How thick should I roll out the Classic Crisco Pie Crust?
A good rule of thumb is to roll the dough into about a 12-inch circle for an 8- or 9-inch pie pan. Aim for roughly 1/8 inch thickness, ensuring the crust bakes evenly and doesn’t become too doughy or too crisp.
Can I use this pie crust for savory pies?
Absolutely! The neutral flavor of Crisco makes this crust incredibly versatile, complementing everything from fruit pies to quiches and pot pies beautifully.
What’s the best way to prevent a soggy bottom crust?
Par-baking (blind baking) your Classic Crisco Pie Crust before adding wet fillings creates a sturdy barrier that helps keep the bottom crisp and free from sogginess. You can also lightly brush the crust with egg white before filling for extra protection.
Final Thoughts
There’s nothing quite like the comfort and confidence you get from making your own pie crust, and the Classic Crisco Pie Crust recipe is here to become your go-to. It’s straightforward, reliable, and delivers that perfect flaky texture every time, making your pies shine in both flavor and appearance. So grab your ingredients, roll up your sleeves, and get ready to bake a crust that’s truly classic in every sense of the word.
PrintClassic Crisco Pie Crust Recipe

This Classic Crisco Pie Crust recipe delivers a flaky, tender crust that’s perfect for every pie, from fruit to custard. Using vegetable shortening ensures a light, crisp texture that holds up well to baking, making it an essential base for all your favorite pie recipes.
- Prep Time: 10 minutes
- Cook Time: 15 minutes (par-baking, optional)
- Total Time: 45 minutes
- Yield: 1 single 9-inch pie crust 1x
- Category: Baking, Pie Crust
- Method: Mixing, Cutting in Shortening, Rolling, Chilling, Baking
- Cuisine: American
- Diet: Vegetarian
Ingredients
Pie Crust Ingredients
- 1 ½ cups all-purpose flour
- ½ teaspoon salt
- ½ cup vegetable shortening (Crisco recommended), cut into 1-inch cubes
- 4 tablespoons ice water
Instructions
- Mix dry ingredients: In a large mixing bowl, stir together 1 ½ cups flour and ½ teaspoon salt until well combined.
- Cut in shortening: Add the ½ cup vegetable shortening cubes to the flour mixture. Using a pastry blender, cut the shortening into the flour until the mixture resembles roughly pea-sized balls. This process helps create the flaky texture of the crust.
- Add ice water gradually: Add ice water one tablespoon at a time, stirring gently with a rubber spatula after each addition to begin bringing the dough together without overworking it.
- Form the dough: After adding all 4 tablespoons of ice water, use your hands to quickly knead the dough into a cohesive disk. Avoid over-kneading to keep the crust tender.
- Chill the dough: Wrap the dough disk tightly in plastic wrap and refrigerate for at least 30 minutes. Chilling helps relax the gluten and firms up the shortening, improving crust texture and ease of handling.
- Roll out dough: Once chilled, remove the dough from the refrigerator and roll it out on a lightly floured surface or pastry mat to about a 12-inch circle, suitable for an 8- or 9-inch pie pan.
- Transfer to pie pan: Carefully lift and transfer the rolled dough into your pie pan, gently pressing it into place. At this point, you can either par-bake the crust for certain recipes or fill it directly before baking.
Notes
- Use ice-cold water to keep the shortening from melting, key for a flaky crust.
- Handling the dough minimally prevents toughness and maintains flakiness.
- You can freeze leftover dough wrapped tightly for up to 1 month.
- For a golden crust, brush with egg wash before baking.
- Par-bake the crust if using wet fillings to prevent sogginess.
Nutrition
- Serving Size: 1/8 of prepared crust
- Calories: 180
- Sugar: 0g
- Sodium: 150mg
- Fat: 12g
- Saturated Fat: 2g
- Unsaturated Fat: 9g
- Trans Fat: 0g
- Carbohydrates: 18g
- Fiber: 1g
- Protein: 2g
- Cholesterol: 0mg
Keywords: pie crust, pie dough, Crisco pie crust, vegetable shortening crust, flaky pie crust, classic pie crust


