
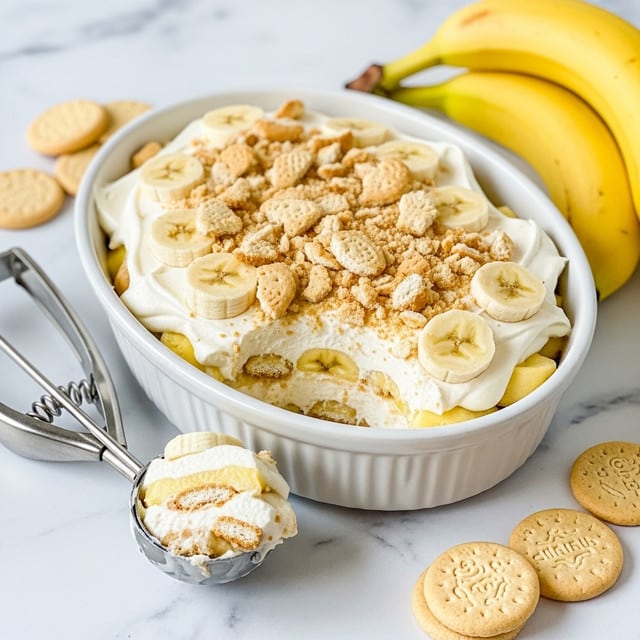
Homemade Banana Pudding Recipe
Introduction
Homemade banana pudding is a classic dessert that’s creamy, sweet, and full of comforting flavors. Layers of smooth vanilla pudding, ripe bananas, and crunchy wafers come together to create a delightful treat perfect for any occasion.

Ingredients
- 3 ripe bananas
- 3 cups vanilla wafers
- 3/4 cup heavy whipping cream
- 2 egg yolks
- 5 tbsp granulated sugar
- 3 tbsp cornstarch
- 1 cup whole milk
- 1 tbsp salted butter
- 1/2 tsp vanilla extract
Instructions
- Step 1: In a heavy-bottomed saucepan, whisk together the egg yolks, granulated sugar, cornstarch, and whole milk until well combined.
- Step 2: Heat the mixture over low heat, whisking constantly. Bring it to a gentle boil and continue whisking until it thickens. Remove from heat and stir in the butter and vanilla extract until smooth.
- Step 3: Pour the pudding into a medium bowl and cover the surface directly with plastic wrap to prevent a skin from forming. Optionally, strain the pudding through a sieve for extra smoothness. Let it cool to room temperature, then refrigerate for at least 1 hour.
- Step 4: In a separate bowl, beat the heavy whipping cream on high speed until soft peaks form. Set aside.
- Step 5: Remove the chilled pudding from the fridge and beat it until smooth with no lumps. Fold one-third of the whipped cream into the pudding gently, then add the remaining whipped cream in two portions, folding carefully each time to maintain airiness.
- Step 6: Layer the dessert by adding a portion of the cream mixture to the bottom of serving glasses or dishes. Top with a layer of vanilla wafers, then add sliced bananas. Repeat the layers until ingredients are used, finishing with a cream layer on top.
- Step 7: Cover tightly with plastic wrap and refrigerate for at least 4 hours or overnight to allow the wafers to soften and flavors to meld.
- Step 8: Before serving, garnish with extra vanilla wafers and banana slices if desired.
Tips & Variations
- Use slightly underripe bananas for firmer slices that hold up better in the layers.
- For extra richness, substitute half the milk with half-and-half or cream.
- Try adding a sprinkle of cinnamon or nutmeg between layers for a warm spice note.
- If you prefer a lighter dessert, use low-fat milk and reduce sugar slightly.
- Replace vanilla wafers with shortbread cookies or graham crackers for a different texture and flavor.
Storage
Store banana pudding covered in the refrigerator for up to 3 days. The flavors improve as it sits, but the bananas may brown over time. For best presentation, add fresh banana slices just before serving. Reheat is not recommended as this dessert is best served chilled.
How to Serve
Serve this delicious recipe with your favorite sides.
FAQs
Can I use instant pudding mix instead of making pudding from scratch?
Yes, instant pudding mix can be used for convenience, but homemade pudding has a fresher, richer flavor and creamier texture that many prefer.
How do I prevent the banana slices from browning?
To slow browning, toss banana slices in a little lemon juice before layering. Adding them just before serving also helps keep them fresh and visually appealing.
PrintHomemade Banana Pudding Recipe

This Homemade Banana Pudding recipe features creamy vanilla pudding layered with ripe bananas and crunchy vanilla wafers. The luscious pudding is made from scratch using egg yolks, milk, and cornstarch, whipped together with heavy cream for a light, airy texture. Chilled for several hours, this classic Southern dessert offers a perfect balance of rich creaminess and delicate sweetness, ideal for family gatherings or special occasions.
- Prep Time: 30 minutes
- Cook Time: 20 minutes
- Total Time: 2 hours 10 minutes
- Yield: 6 servings 1x
- Category: Dessert
- Method: Stovetop
- Cuisine: Southern American
Ingredients
Pudding
- 2 egg yolks
- 5 tbsp granulated sugar
- 3 tbsp cornstarch
- 1 cup whole milk
- 1 tbsp salted butter
- 1/2 tsp vanilla extract
Assembly
- 3 ripe bananas
- 3 cups vanilla wafers
- 3/4 cup heavy whipping cream
Instructions
- Prepare the Vanilla Pudding: In a heavy-bottomed saucepan, whisk together the egg yolks, granulated sugar, cornstarch, and whole milk until well combined. This ensures a smooth pudding base free of lumps.
- Cook the Pudding: Place the saucepan over low heat and cook, whisking constantly until the mixture thickens and comes to a gentle boil. Once thickened, remove from heat and immediately whisk in the salted butter and vanilla extract until fully incorporated for a rich, flavorful pudding.
- Cool the Pudding: Transfer the hot pudding to a medium bowl and cover the surface tightly with plastic wrap, pressing it directly onto the pudding to prevent a skin from forming. Optionally, strain the pudding through a sieve to remove any lumps. Allow it to cool to room temperature, then refrigerate for at least 1 hour until chilled.
- Whip the Cream: In a separate bowl, beat the heavy whipping cream on high speed with a mixer or hand whisk until soft peaks form. This whipped cream will lighten and enrich the pudding filling.
- Combine Pudding and Whipped Cream: Remove the chilled pudding from the fridge and beat it on high speed until smooth. Fold one-third of the whipped cream into the pudding gently or beat on low speed to combine, then fold in the remaining whipped cream in two additions. This blending creates a light, fluffy filling.
- Assemble the Layers: In serving glasses or a trifle dish, spread a layer of the cream mixture on the bottom. Top with a layer of vanilla wafers, then arrange banana slices over the wafers. Repeat layering, ending with the cream mixture on top.
- Chill the Assembled Pudding: Cover the assembled dessert tightly with plastic wrap and refrigerate for at least 4 hours or overnight to allow the wafers to soften and flavors to meld.
- Serve and Garnish: Just before serving, garnish the banana pudding with extra vanilla wafers and sliced bananas if desired for presentation and added texture.
Notes
- Pressing plastic wrap directly onto the pudding surface prevents an unpleasant skin from forming.
- Chilling the assembled pudding for several hours is essential for the wafers to soften and the flavors to combine well.
- Use ripe bananas for the best sweetness and flavor.
- For a lighter version, you may substitute half-and-half for whole milk, though it will slightly alter the creaminess.
- This pudding can be prepared a day in advance, making it perfect for entertaining.
Keywords: banana pudding, homemade banana pudding, vanilla pudding, classic southern dessert, layered dessert, creamy pudding, banana dessert

