
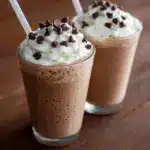
No-Ice-Cream-Needed Chocolate Milkshake Recipe
Imagine indulging in a creamy, dreamy chocolate treat that doesn’t require any ice cream to taste absolutely heavenly. This No-Ice-Cream-Needed Chocolate Milkshake delivers rich chocolate flavor and luscious texture using simple, wholesome ingredients. It’s perfect for those moments when you want a milkshake fix but don’t have any ice cream on hand—or just want something a bit lighter without sacrificing taste. Trust me, once you try this, you’ll be hooked on this easy and satisfying chocolate delight.
Ingredients You’ll Need

Ingredients You’ll Need
These ingredients are both simple and essential, coming together to create a smooth, rich, and naturally sweet milkshake. Each one has a purpose—from the creaminess of the frozen banana to the deep chocolate notes of cacao powder, every element adds to the magic.
- Ice (1 cup): Adds chill and thickness, mimicking the refreshing texture of a traditional milkshake.
- Organic Valley® Lowfat Chocolate Milk (1 cup): Brings in creamy chocolate flavor with a light touch that balances richness.
- Organic Valley® Heavy Whipping Cream (3 tablespoons): Enhances creaminess and gives the shake a luscious mouthfeel.
- Frozen Banana (1 large, peeled): Offers natural sweetness and a creamy texture without needing ice cream.
- Cacao Powder (2 tablespoons): Delivers that deep, intense chocolate flavor – unsweetened cocoa powder works great too!
- Vanilla Extract (1 teaspoon): Brightens all the flavors with a subtle, fragrant hint.
- Pinch of Salt: Balances the sweetness and enriches the chocolate notes.
- Whipped Cream and Chocolate Shavings (optional): Perfect for garnishing if you want to jazz up your milkshake.
How to Make No-Ice-Cream-Needed Chocolate Milkshake
Step 1: Combine the Base Ingredients
Start by adding the ice, lowfat chocolate milk, and heavy whipping cream to your blender. These create the creamy, frothy foundation for your milkshake.
Step 2: Add the Frozen Banana and Flavorings
Break the frozen banana into thirds and toss it in, along with the cacao powder, vanilla extract, and just a pinch of salt. The banana is the secret to that thick, velvety texture, making the shake feel indulgent and smooth.
Step 3: Blend Until Silky Smooth
Blend everything together until the mixture is silky and lump-free. Pause occasionally to scrape down the sides, making sure every bit is combined evenly for the perfect consistency.
Step 4: Pour and Serve
Once your No-Ice-Cream-Needed Chocolate Milkshake is blended to perfection, pour it into glasses. If you’re feeling fancy, add a swirl of whipped cream and sprinkle with chocolate shavings for a little extra flair.
How to Serve No-Ice-Cream-Needed Chocolate Milkshake

Garnishes
Garnishes can take your milkshake to the next level. A dollop of whipped cream adds a cloud-like finish, while chocolate shavings or even a dusting of cacao powder adds texture and looks gorgeous. If you want a nutty twist, crushed toasted almonds work beautifully too.
Side Dishes
This chocolate milkshake pairs wonderfully with light and crunchy snacks like biscotti, simple butter cookies, or even a fresh fruit salad. The shake’s richness contrasts beautifully with these crisp textures and mild flavors, creating a delightful balance.
Creative Ways to Present
For a playful presentation, serve the milkshake in vintage glassware or mason jars. Add a striped straw or a fun reusable one to up the charm factor. You can also rim the glasses with chocolate syrup or crushed cookies for an extra special touch that will wow anyone you share it with.
Make Ahead and Storage
Storing Leftovers
If you have any leftover No-Ice-Cream-Needed Chocolate Milkshake, store it in an airtight container in the refrigerator for up to 24 hours. Give it a quick stir or gentle shake before drinking, as some separation can occur naturally.
Freezing
Though best enjoyed fresh and cold-but-not-frozen, you can freeze the milkshake in portions. When ready to enjoy, let it thaw slightly and blend again for that original creamy texture. This prevents any icy chunks and keeps the milkshake smooth.
Reheating
Reheating this milkshake is not recommended since warming it up defeats the purpose of the refreshing cold treat. Instead, try blending a little more fresh milk or cream if you want to loosen the texture after refrigeration.
FAQs
Can I use regular milk instead of lowfat chocolate milk?
Absolutely! Using regular milk is fine, but the flavor will be less intense. To punch up the chocolate taste, add a bit more cacao powder or a splash of chocolate syrup.
Is it necessary to use a frozen banana?
Frozen bananas are key for achieving that thick, creamy milkshake texture without ice cream. If you only have fresh bananas, add more ice and blend longer, but the shake won’t be quite as smooth.
Can I make this milkshake vegan?
Yes! Replace the lowfat chocolate milk and heavy cream with your favorite plant-based chocolate milk and coconut cream. The flavor and texture will be just as delicious.
What if I don’t have cacao powder?
If you don’t have cacao powder, unsweetened cocoa powder works perfectly well. Just make sure it’s unsweetened to control the sugar level in your milkshake.
How many servings does this recipe make?
This recipe makes two generous 8-ounce servings, perfect for sharing or saving one for later.
Final Thoughts
This No-Ice-Cream-Needed Chocolate Milkshake is a revelation for anyone who loves thick, creamy chocolate shakes without needing to raid the freezer for ice cream. It’s simple, wholesome, and wonderfully satisfying. I really hope you give this recipe a go and find it as comforting and delicious as I do—it might just become your new favorite way to enjoy chocolate!
PrintNo-Ice-Cream-Needed Chocolate Milkshake Recipe
A creamy, delicious chocolate milkshake made without ice cream, using frozen bananas and rich chocolate milk for a smooth, indulgent treat that’s easy to prepare at home.
- Prep Time: 5 minutes
- Cook Time: 0 minutes
- Total Time: 5 minutes
- Yield: 2 servings 1x
- Category: Beverage
- Method: Blending
- Cuisine: American
- Diet: Vegetarian
Ingredients
Milkshake Base
- 1 cup ice
- 1 cup Organic Valley® Lowfat Chocolate Milk
- 3 tablespoons Organic Valley® Heavy Whipping Cream
Flavorings
- 1 large banana, peeled and frozen
- 2 tablespoons cacao powder (or unsweetened cocoa powder)
- 1 teaspoon vanilla extract
- Pinch of salt
Optional Toppings
- Whipped cream
- Chocolate shavings
Instructions
- Combine Ingredients: In a blender, add the ice, chocolate milk, and heavy whipping cream. Break the frozen banana into thirds and add it to the blender along with the cacao powder, vanilla extract, and a pinch of salt.
- Blend Smooth: Blend all ingredients until smooth, stopping occasionally to scrape down the sides to ensure everything is fully incorporated.
- Serve: Pour the milkshake into glasses and serve immediately. Optionally, garnish with whipped cream and chocolate shavings for extra indulgence. This recipe makes two 8-ounce servings.
Notes
- Freezing the banana beforehand adds creaminess and eliminates the need for ice cream.
- If you prefer a thicker shake, add more frozen banana or reduce the milk slightly.
- You can substitute cacao powder with unsweetened cocoa powder for a similar rich chocolate taste.
- For a dairy-free option, replace milk and cream with plant-based alternatives.
- Adjust sweetness by adding honey or sweetener if desired.
Nutrition
- Serving Size: 1 cup (8 ounces)
- Calories: 180
- Sugar: 22g
- Sodium: 100mg
- Fat: 6g
- Saturated Fat: 3.5g
- Unsaturated Fat: 2g
- Trans Fat: 0g
- Carbohydrates: 30g
- Fiber: 4g
- Protein: 4g
- Cholesterol: 20mg
Keywords: chocolate milkshake, no ice cream milkshake, banana chocolate shake, healthy milkshake, easy dessert, frozen banana shake


