
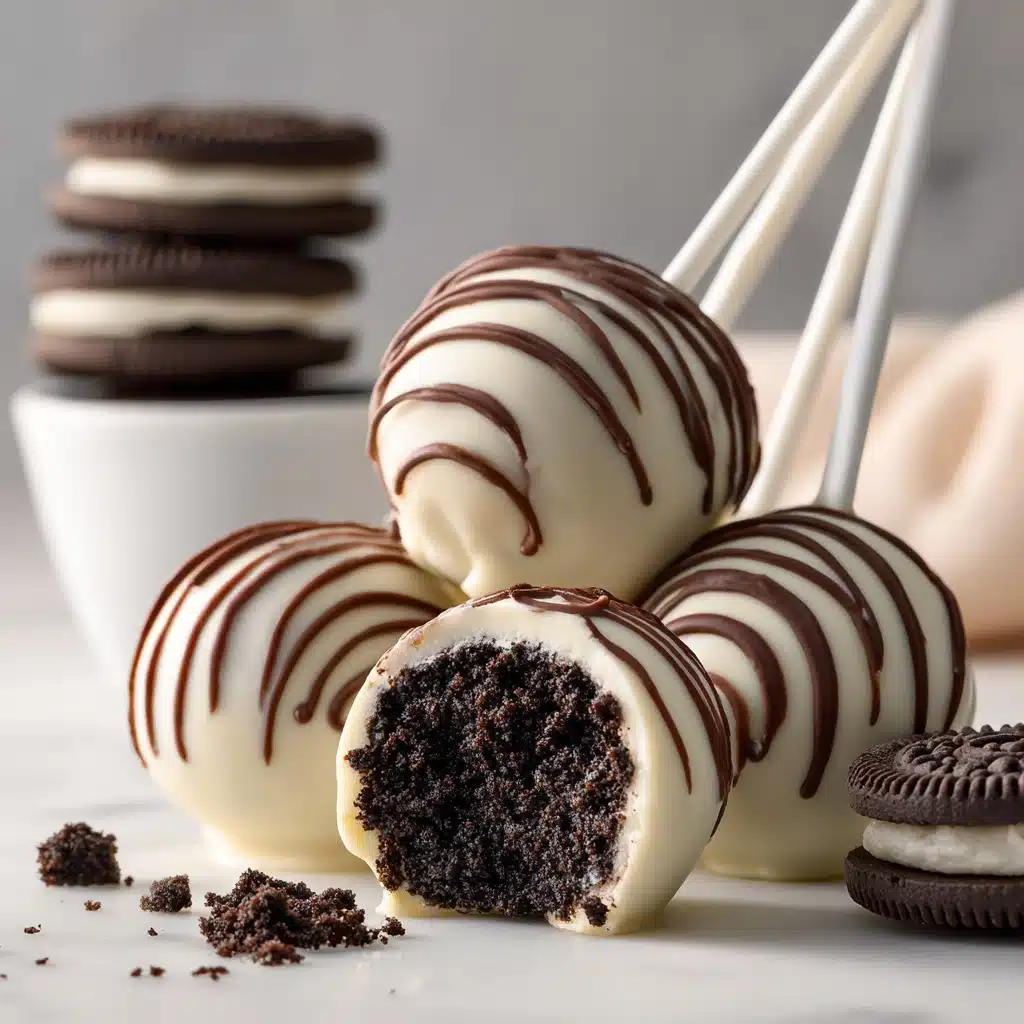
Oreo Cake Pops Recipe
Imagine delighting in the irresistible combination of crunchy, chocolatey cookies and creamy, tangy cheesecake—all in a perfectly poppable, hand-held treat. That’s the magic of Oreo Cake Pops: a bite-sized dessert bursting with nostalgia and beloved by both kids and adults. Easy to make yet impressive enough for any special occasion, these fudgy, chocolate-dipped gems promise both fun in the kitchen and huge grins when served.

Ingredients You’ll Need
What I adore most about this recipe is how just a handful of simple ingredients come together to create utter decadence. Every component plays a starring role—giving flavor, texture, and that signature cookies-and-cream look!
- Oreo cookies (24): These iconic sandwich cookies bring the deep chocolate crunch and classic flavor you crave.
- Cream cheese (70 g, softened): Just the right amount makes the pops rich, creamy, and perfectly smooth.
- White chocolate: For that lusciously sweet coating, which provides a gorgeous canvas for decorating.
- Semi-sweet chocolate: A drizzle of dark, semi-sweet chocolate adds contrast, drama, and a touch of elegance.
- Lollipop sticks: Essential for the cake pop experience—turning these treats into party-ready showstoppers.
How to Make Oreo Cake Pops
Step 1: Pulverize the Oreos
Start by placing your Oreo cookies in a food processor and blitzing them into a fine, sandy powder. You want absolutely no lumps here! The smooth crumble is key to achieving that decadent, fudge-like texture at the heart of every bite.
Step 2: Mix in the Cream Cheese
Scoop your softened cream cheese onto the Oreo crumbs and blend thoroughly with a sturdy spoon or spatula. The mixture should come together easily, turning dense, rich, and easily workable. This step transforms the crumbs into a luscious, rollable “dough.”
Step 3: Shape the Cake Pops
Portion the mixture into 20 equal pieces, each weighing about 20 grams. Roll into tight, smooth balls with clean hands, packing a little love (and pressure!) into every one. This is your canvas for the gorgeous Oreo Cake Pops ahead!
Step 4: Chill the Cake Balls
Place the formed balls on a tray and pop them in the fridge for around 20 minutes. This short chill firms up the centers, making them much easier to handle for dipping and decorating later.
Step 5: Melt the White Chocolate
Break your white chocolate into pieces and heat gently using a double boiler or in short bursts in the microwave. Stir until silky-smooth and runny, then transfer it into a deep bowl that’s easy to dip into—no seizing or overheating!
Step 6: Insert the Sticks
Dip the tip of each lollipop stick into the melted white chocolate, then gently insert it halfway into the center of each chilled cake ball. This trick helps “glue” the stick in place, ensuring not a single pop goes rogue! Repeat for all the balls.
Step 7: Dip in White Chocolate
Now for the magic moment: one by one, submerge each cake pop completely in melted white chocolate, swirling gently to coat. Lift up and give a soft shake to let any excess drip back—this keeps the finish smooth and not too thick.
Step 8: Let Them Set and Decorate
Stand your freshly dipped Oreo Cake Pops upright in a cake pop stand or a foam block, letting the chocolate shell harden. Once set, drizzle melted semi-sweet chocolate over the tops with a piping bag to add your own artistic flair.
Step 9: Final Chill
Return the decorated cake pops to the fridge for a final chill, allowing all the chocolate to fully set up with a gorgeous glossy finish. Now they’re ready for their closeup (and your taste buds)!
How to Serve Oreo Cake Pops
Garnishes
Try adding a sprinkle of crushed Oreos, edible glitter, or colorful sprinkles while the chocolate is still wet for an extra pop of personality and texture. A pinch of flaky sea salt is fabulous too, balancing out the sweetness beautifully.
Side Dishes
Because these are rich and chocolatey, a platter of fresh strawberries or a glass of cold milk pairs perfectly alongside your Oreo Cake Pops. For kids’ parties, arrange with mini vanilla milkshakes or bowls of fresh berries to lighten things up.
Creative Ways to Present
Display your pops in decorative jars filled with sugar or rice, letting them stand upright like a bouquet. For birthdays, try wrapping each pop in cellophane with a bright ribbon for fuss-free party favors, or arrange in themed boxes for a wow-worthy dessert table centerpiece.
Make Ahead and Storage
Storing Leftovers
Leftover Oreo Cake Pops can be kept fresh for up to 5 days in the fridge. Store them upright in an airtight container to prevent condensation, which can soften the chocolate. A sheet of parchment paper helps keep everything tidy and beautiful.
Freezing
For longer storage, freeze your finished pops by placing them on a tray until solid, then transferring to a freezer-safe bag or box. They’ll keep for up to 2 months. Allow them to thaw overnight in the fridge before serving for the best taste and texture.
Reheating
These treats are best enjoyed chilled or at room temperature, not warm. If you like, let them sit out for 10 minutes before serving to take off the fridge chill, but avoid reheating or microwaving, as the chocolate coating can sweat or melt.
FAQs
Can I use a different type of chocolate for dipping?
Absolutely! Milk chocolate or dark chocolate both work well in place of white chocolate, depending on your flavor preference. Get creative and try colored candy melts to tie in with party themes!
What’s the best way to crush Oreos without a food processor?
If you don’t have a food processor, simply place the cookies in a zip-top bag and crush with a rolling pin until you have fine crumbs. Just be sure to crush thoroughly; chunky bits can make rolling the pops tricky.
Can I make Oreo Cake Pops in advance for a party?
Definitely! Since they keep so well in the fridge (or freezer), you can prepare Oreo Cake Pops a day or two ahead. Just store them in an airtight container and decorate closer to serving if you’re adding sprinkles or delicate toppings.
Are there any substitutions for cream cheese?
If you need a substitute, mascarpone or thick Greek yogurt can work in a pinch, but cream cheese delivers the best structure and taste. Make sure whatever you use is soft and not watery.
Why are my cake pops falling off the sticks?
If the balls are too warm or the chocolate “glue” isn’t set, the pops may slip. Always chill the balls thoroughly, and don’t skip dipping the stick in chocolate first. That extra bond makes all the difference!
Final Thoughts
If you’re ready for a dessert that’s as fun to make as it is to eat, Oreo Cake Pops are an absolute must-try. These little bites of delight turn a classic cookie into something unforgettable. Invite a friend to join you in the kitchen or surprise your family with a batch—they’re sure to bring joy with every bite!
PrintOreo Cake Pops Recipe

These delicious Oreo cake pops are a fun and easy-to-make treat that everyone will love. They are perfect for parties, special occasions, or just as a sweet indulgence.
- Prep Time: 30 minutes
- Cook Time: 0 minutes
- Total Time: 50 minutes
- Yield: 20 cake pops 1x
- Category: Dessert
- Method: Blending, Chilling, Dipping
- Cuisine: American
- Diet: Vegetarian
Ingredients
Oreo Cake Pops:
- 24 Oreo cookies (approx. 260 g)
- 70 g (1/3 cup) Cream cheese, softened
- White and semi-sweet chocolate for coating
Instructions
- Finely blend the Oreo cookies: In a food processor, blend the Oreo cookies until they form a fine powder with no lumps.
- Add the cream cheese: Mix the cream cheese with the Oreo powder until smooth and compact.
- Shape the cake pops: Form 20 balls of dough, each weighing around 20g.
- Chill the cake balls: Place the Oreo cake balls in the fridge for about 20 minutes.
- Melt the white chocolate: Heat the white chocolate until smooth and runny.
- Prepare the cake pops: Dip a lollipop stick into the melted chocolate, insert it into a cake pop, and repeat for all Oreo balls.
- Coat the cake pops: Dip each cake pop into the melted chocolate, shake off excess, and place on a stand to harden.
- Decorate: Once hardened, decorate the cake pops with melted dark chocolate using a piping bag.
- Chill and serve: Let the cake pops cool completely in the fridge before serving.
Notes
- You can customize these cake pops by adding sprinkles, edible glitter, or drizzles of caramel or colored chocolate.
- For a twist, try using different flavors of Oreo cookies or adding chopped nuts to the cake pop mixture.
Nutrition
- Serving Size: 1 cake pop
- Calories: 120
- Sugar: 10g
- Sodium: 80mg
- Fat: 7g
- Saturated Fat: 3g
- Unsaturated Fat: 4g
- Trans Fat: 0g
- Carbohydrates: 12g
- Fiber: 1g
- Protein: 1g
- Cholesterol: 5mg
Keywords: Oreo, Cake Pops, Dessert, Easy, Party, Chocolate


