
Pistachio Tiramisu Recipe
Introduction
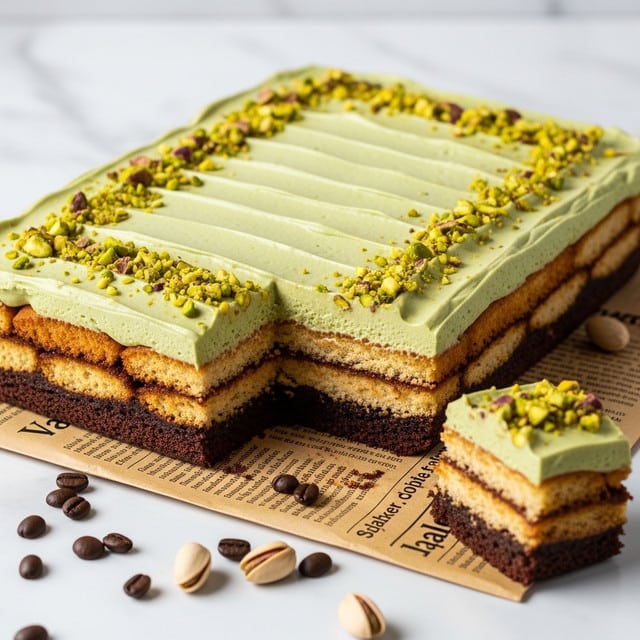
Pistachio Tiramisu is a delightful twist on the classic Italian dessert, combining the rich flavors of pistachio with creamy mascarpone and espresso-soaked ladyfingers. This elegant treat is perfect for gatherings or a special occasion, offering a nutty, smooth, and indulgent finish to any meal.

Ingredients
- 12 ladyfingers
- Roasted pistachios, chopped
- 1/2 cup hot strong coffee or espresso
- 1 tbsp granulated sugar
- 2 tbsp liqueur (such as coffee or amaretto)
- 4 oz mascarpone cheese
- 3/4 cup heavy whipping cream
- 3 tbsp confectioners’ sugar
- 1/2 tsp vanilla extract
- 1/4 cup pistachio paste
Instructions
- Step 1: In a small bowl, combine the hot coffee with granulated sugar and stir until the sugar dissolves. Allow this coffee syrup to cool completely.
- Step 2: Once cooled, add the liqueur to the coffee syrup and mix well. Set aside for soaking the ladyfingers.
- Step 3: In a large mixing bowl, use a hand mixer or stand mixer fitted with a whisk attachment to beat the heavy whipping cream, confectioners’ sugar, and vanilla extract on high speed until stiff peaks form.
- Step 4: Gently fold in the mascarpone cheese and pistachio paste using low speed or by hand until fully combined. Chill this pistachio mascarpone cream in the refrigerator until ready to use.
- Step 5: Lightly dip each ladyfinger into the coffee syrup, ensuring both sides are moistened but not soaked through, and arrange a single layer on the bottom of a 7.5×5-inch (19×12 cm) rectangular dish.
- Step 6: Pipe or spread half of the pistachio mascarpone cream evenly over the ladyfinger layer.
- Step 7: Repeat the soaking process with the remaining ladyfingers and arrange another layer over the cream.
- Step 8: Spread the remaining pistachio mascarpone cream on top of the second ladyfinger layer.
- Step 9: Cover and refrigerate the tiramisu for at least 6 hours, preferably overnight, to allow flavors to meld and cream to set.
- Step 10: Just before serving, sprinkle the top generously with chopped roasted pistachios for added texture and flavor.
Tips & Variations
- Use freshly brewed espresso for a stronger coffee flavor.
- Substitute the liqueur with coffee syrup or omit it for a non-alcoholic version.
- For extra richness, fold finely chopped pistachios directly into the mascarpone cream.
- Try adding a sprinkle of cocoa powder or grated dark chocolate on top for a chocolatey touch.
Storage
Store the pistachio tiramisu covered in the refrigerator for up to 3 days. The flavors improve with time as they meld. When ready to serve, you can enjoy it cold straight from the fridge; reheating is not recommended as it’s best served chilled.
How to Serve
Serve this delicious recipe with your favorite sides.
FAQs
Can I prepare pistachio tiramisu in advance?
Yes, preparing it a day ahead is ideal as it allows the flavors to develop and the cream to set perfectly.
What can I use if I don’t have pistachio paste?
If pistachio paste isn’t available, you can blend roasted pistachios with a small amount of neutral oil or cream to create a smooth paste, or simply omit it and rely on chopped nuts for texture.
PrintPistachio Tiramisu Recipe

This Pistachio Tiramisu is a delightful twist on the classic Italian dessert, featuring layers of coffee-soaked ladyfingers and a rich pistachio mascarpone cream. Enhanced with pistachio paste and roasted pistachios, it offers a nutty and creamy flavor profile that pairs perfectly with the bold espresso. Prepared without baking, this no-cook dessert requires chilling to set, making it an elegant and easy-to-assemble treat for any occasion.
- Prep Time: 20 minutes
- Cook Time: 0 minutes
- Total Time: 6 hours 20 minutes (including chilling time)
- Yield: 4 servings 1x
- Category: Dessert
- Method: No-Cook
- Cuisine: Italian
Ingredients
For the Coffee Syrup
- 1/2 cup hot strong coffee or espresso
- 1 tbsp granulated sugar
- 2 tbsp liqueur (such as Marsala, Amaretto, or coffee liqueur)
For the Pistachio Mascarpone Cream
- 3/4 cup heavy whipping cream
- 3 tbsp confectioners’ sugar
- 1/2 tsp vanilla extract
- 4 oz mascarpone cheese
- 1/4 cup pistachio paste
Other Ingredients
- 12 ladyfingers
- Roasted pistachios, chopped (for garnish)
Instructions
- Prepare the Coffee Syrup: In a small bowl, combine the hot strong coffee or espresso with the granulated sugar. Stir until the sugar is completely dissolved. Allow the mixture to cool fully to room temperature.
- Add Liqueur: Once the coffee mixture is cool, stir in the liqueur of your choice to infuse additional flavor. Set the syrup aside for dipping the ladyfingers later.
- Make the Pistachio Mascarpone Cream: In a large mixing bowl, use a handheld mixer or stand mixer fitted with a whisk attachment to beat the heavy whipping cream, confectioners’ sugar, and vanilla extract on high speed until stiff peaks form, indicating the cream is whipped perfectly.
- Incorporate Mascarpone and Pistachio Paste: Lower the mixer speed and add mascarpone cheese and pistachio paste to the whipped cream. Beat slowly until the ingredients are thoroughly combined and smooth. Place the mixture in the refrigerator to chill until assembly.
- Dip Ladyfingers: One at a time, gently dip both sides of each ladyfinger into the prepared coffee syrup, ensuring they are soaked but not soggy, then arrange them in a single layer on the bottom of a 7.5×5-inch (19×12 cm) rectangular dish.
- First Layer of Cream: Pipe or spread half of the chilled pistachio mascarpone cream evenly over the ladyfingers to create the first creamy layer.
- Repeat the Layers: Dip the remaining ladyfingers into the coffee syrup individually and place them on top of the cream layer. Then, pipe or spread the remaining pistachio mascarpone cream over the second layer of ladyfingers.
- Chill the Tiramisu: Cover the dish with plastic wrap and refrigerate the tiramisu for at least 6 hours or overnight to allow the flavors to meld and the dessert to set properly.
- Garnish and Serve: Just before serving, sprinkle the top generously with chopped roasted pistachios for added crunch and visual appeal. Slice and enjoy this luscious pistachio tiramisu.
Notes
- Ensure the coffee syrup is fully cooled before dipping the ladyfingers to prevent them from becoming too soggy.
- For a non-alcoholic version, omit the liqueur or substitute with coffee-flavored syrup.
- The pistachio paste can be found at specialty stores or online; alternatively, make your own by blending roasted pistachios with a small amount of neutral oil.
- Use chilled heavy cream for better whipping results.
- This dessert is best served after chilling overnight to develop full flavor and texture.
Keywords: Pistachio Tiramisu, Italian dessert, no bake tiramisu, pistachio mascarpone cream, coffee soaked ladyfingers, nutty tiramisu recipe


